Building JavaScript widget
Widget is a sort of SDK or client of your service that other site owners embed on their websites. At the minimum they consist of JavaScript code and, if there is a UI part, HTML with CSS. Different widgets do different things, but the common for them is that you hand over some small piece of code to be embedded on foreign site.
For the widget to be successful there are a few really important non functional requirements:
- Widget’s code should never ever mess up with the site it being hosted on. Think isolation.
- It should support the whole spectrum of browsers that users of the sites may use. Think IE6.
- It should not affect (or have a minimum impact on) performance of the website. Think small and async.
- You cannot rely on any library or it’s specific version presented on a site. On another hand, the library you are depending on can be already loaded on the site. Think
noConflict().
TLTR;
The end result of what we build here is located here. This is some sort of template for creating JavaScript widget with HTML and CSS in which I find comfortable to develop and easy to deploy as single small JS file.
The embeddable part
This is the block of code that the website owner will need to embed on his/her website. This code block must have a smallest possible footprint. If it will be large, it may just scare out site owner.
So the obvious that many other articles suggest is to have something like this:
1
<script src="https://widget.com/script.js" type="text/javascript"></script>
A few problems with this approach:
- It is blocking. You can fix it with
asyncattribute if you care of IE 10+ only. - You don’t control the location of the script within HTML document - it is up to the site owner where he will place it.
- If you need some additional configurations you will need to add an additional
scriptblock, which makes it less solid and may lead to confusion, forgetting one of the parts (not all site owners are technical people), mixing their order, etc.:
1
2
3
4
<script src="https://widget.com/script.js" type="text/javascript"></script>
<script type="text/javascript">
    widget.settings({someParam: true});
</script>
Basically those are reasons why Google Analytics, Facebook SDK and other vendors with high JavaScript SDKs usages ended with something similar to this:
1
2
3
4
5
6
7
<script>
  (function(i,s,o,g,r,a,m){i['GoogleAnalyticsObject']=r;i[r]=i[r]||function(){
  (i[r].q=i[r].q||[]).push(arguments)},i[r].l=1*new Date();a=s.createElement(o),
  m=s.getElementsByTagName(o)[0];a.async=1;a.src=g;m.parentNode.insertBefore(a,m)
  })(window,document,'script','//www.google-analytics.com/analytics.js','ga');
  ga('create', 'UA-XXXXXX-XX', 'auto');
</script>
The code above solves all 3 issues I mentioned above plus a few extra cool things. Here the same code which I un-obfusticated and added explanations:
The script creates isolated scope via self-evaluated function which is important in order not to collide with others on the page. The last line is the configurations that site owner may add (e.g. UI, behavior, etc.) and the one line before this (parameters that passed to the method) are kinda “advanced” configurations for developers.
Now that we have a good understanding of how the implantation should look like let’s create something similar:
1
2
3
4
5
6
(function (w,d,s,o,f,js,fjs) {
    w['MyWidget']=o;w[o] = w[o] || function () { (w[o].q = w[o].q || []).push(arguments) };
    js = d.createElement(s), fjs = d.getElementsByTagName(s)[0];
    js.id = o; js.src = f; js.async = 1; fjs.parentNode.insertBefore(js, fjs);
}(window, document, 'script', 'mw', '//SOME_CDN/widget.js'));
mw('init', { showButton: true });
You will find this script located in demo page, which simulates client’s site and we’ll use it for development purpose.
Application Structure
Widget application is what will be loaded and executed by the embedded script on site. It may have different degree of complexity, but for any use case it should:
- Have a good structure for separation of concerns and test-ability, which means proper module loading
- Convenient development experience via hot-module reloading
I’ll use WebPack to address requirements above, but first let’s finalize the structure of the app:
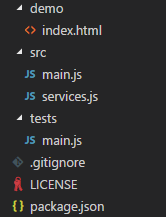
It’s pretty common structure for JS application. Code goes into src and the entry point is main.js. The demo folder contains an emulated site’s page we talked before, it is also the page that we’ll serve by local dev server to develop widget application.
Let’s start with simple main.js:
1
2
3
4
5
6
7
import { ping } from './services'

function app() {
    console.log('JS-Widget starting');
}

app();
Our main function is app() which evaluated as soon as this module loaded. Also note that I’m using here ECMAScript 6 module loading, which allows us to separate and isolate different parts of application.
Building and running
The next step is to build and able to serve the app to browser. As I mention, we’ll use WebPack and we’ll need the following packages:
1
npm install webpack webpack-dev-server copy-webpack-plugin --save-dev
What I want to achieve is that WebPack will take the whole application with all its modules and produce a servable single file which will be loaded in demo/index.html file. For this to happen I need to add webpack.config.js file in root with the following configuration:
1
2
3
4
5
6
7
8
9
10
11
12
13
14
15
16
17
18
const path = require('path');
const webpack = require('webpack');
var copyWebpackPlugin = require('copy-webpack-plugin');
const bundleOutputDir = './dist';

module.exports = (env) => {
    return [{
        entry: './src/main.js',
        output: {
            filename: 'widget.js',
            path: path.resolve(bundleOutputDir),
        },
        devServer: {
            contentBase: bundleOutputDir
        },
        plugins: [new webpack.SourceMapDevToolPlugin(), new copyWebpackPlugin([{ from: 'demo/' }])]
    }];
};
Note how we instruct WebPack what is the entry of the application - main.js, so it can traverse it and produce a single file in dist/widget.js. There are also 2 plugins to allow mapping of source code for debugging, and copying the index.html into build destination. The last interesting thing here is devServer section which instructs local HTTP server to serve the dist folder.
To build let’s run:
1
 ./node_modules/.bin/webpack --config webpack.config.js
and check the result in dist folder.
Now, let’s serve it:
1
./node_modules/.bin/webpack-dev-server --open
Once browser is launched, go to the browser’s console and you should find JS-Widget starting log entry, which means the application (widget) was loaded.
At this stage you will be able to develop the application (adding and modifying JS files) and the webpack-dev-server will auto-reloaded those modules in your browser.
Building release
First of all we need to differentiate between build types. We’ll do it by passing argument --env.prod to BuildPack:
1
./node_modules/.bin/webpack --config webpack.config.js --env.prod
and inside webpack.config.js file we’ll be able to “catch” it:
1
2
3
4
module.exports = (env) => {
    const isDevBuild = !(env && env.prod);
    ...
};
The second thing we’ll want to do is to minimize the output. This is done by adding UglifyJsPlugin plugin for non-dev build:
1
2
3
4
5
6
7
8
    module.exports = (env) => {
        const isDevBuild = !(env && env.prod);
        ...
            plugins: isDevBuild
                ? [new webpack.SourceMapDevToolPlugin(), new copyWebpackPlugin([{ from: 'demo/' }])]
                : [new webpack.optimize.UglifyJsPlugin()]
        ...
    };
Now we can run build with release parameter and you will get combined, obfuscated and minimized JS file in dist folder.
The next phase is to be able write code in modern version of JavaScript (e.g. ECMAScript 6) and during build transpile it down to code that can be executed in, let’s say, IE6. This is where Babel comes into the picture. We’ll need the following dependencies:
1
npm install @babel/core @babel/preset-env babel-loader@next --save-dev
and then, again, let’s change the webpack.config.js. The babel is added as module to WebPack, which allows to manipulate the intermediate result before it’s written to the output:
1
2
3
4
5
6
7
8
9
10
11
12
13
14
15
16
17
18
module.exports = (env) => {
  ...
  module: {
    rules: [
      {
        test: /\.js$/i, exclude: /node_modules/, use: {
          loader: 'babel-loader',
          options: {
            presets: [['@babel/env', {
                'targets': { 'browsers': ['ie 6', 'safari 7'] }
            }]]
          }
        }
      }
    ]
  }
  ...
};
Note how we target specific browsers instead of version of JavaScript, which is much more convenient.
Adding HTML and CSS
Some widget may have UI components in them, those much easier to construct by using HTML markup and CSS. But, again, we want to have a minimal footprint in network - not to load additional files. The ideal will be to combine CSS and HTML in to the same JS file.
There is, however, one down side that you need to be aware of. In this solution the CSS is not isolated from the rest of the styles on page - it’s injected into the page itself under dynamically added style tag. The HTML is also may be affected by styles on the page, unless you will be appending it into iframe tags, which has it’s own downsides.
There is much robust solution to a CSS and HTML isolation - Shadow DOM, but unfortunately the browsers support of such feature and nature of JS widget don’t play well together.
Let’s see how we can do it. We’ll leverage again WebPack’s modules. The following packages required:
1
npm install css-loader html-loader style-loader --save-dev
and in webpack.config.js add in modules the following:
1
2
3
4
5
6
7
8
module.exports = (env) => {
    ...
    module: {
        rules: [
            { test: /\.html$/i, use: 'html-loader' },
            { test: /\.css$/i, use: ['style-loader', 'css-loader' + (isDevBuild ? '' : '?minimize')] },
    ...
};
Note how those modules targeted by css and html extensions of files. The rest is standard ES module loader. I added HTML with CSS files and the JS module just importing those files:
1
2
import template from './message.html';
import './message.css';
The template variable will contain a string representation of the HTML “template”, which needs to be converted to HTML Element and appended to page document.
External librarires
The widget itself has no external runtime dependencies. This guarantees a minimal footprint. It doesn’t mean you cannot use external libraries, but should use and load them responsibly - load asynchronously and avoid conflicts with site’s frameworks.
Another thing to consider is that may be the library you are depending on is already presented on the hosting site. jQuery for instance still has a high usage. Take a look at this example on how to load jQuery without conflicting or alternately use already loaded jQuery.
It is probably worth mentioning that relying on Angular in most cases will be an overkill. Most widgets have single or, at top, a few views, so it wiser to rely on something much compact (e.g. Vue.js).
Summary
We had built something that can be used as good start for developing JS widget that can be deployed to other websites. We didn’t compromise on development experience and used a modern tooling with modern language features, but still were able to target old browsers.
You can find all source code of the widget here.
Update May 2020
I wrote a second part of the article, which go further in implementing the UI widget and explains a deployment scenarios. You can read it here.