This is sort of the second part of the post I wrote a while ago about building JavaScript widget. To my surprise, I received a lot of valuable feedback and some questions on how to deal with some specific scenarios:
- How to use it with UI framework (e.g. React or Angular)
- What is the best way to manage configurations
- How to serve multiple instances from the same page
- How the deployment of such thing looks like
Those are all valid questions. So the idea here is to extend the original example and make from it an actual deployable widget:
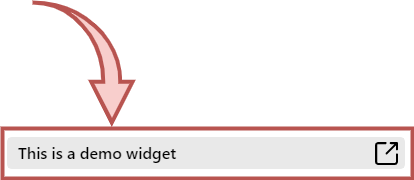 Widget that is shown on bottom right of the page (it may look dark if you are into dark theme)
Go ahead and play around with this. This is the most basic example I came up with and it has:
- Basic form with validation
- Some list that fetched from remote endpoint
- A concept of multiple views/pages
- Styles that are responsive for viewport and dark/light themes. A couple of SVG icons and yet everything is loaded in a single round trip to CDN.
Like in original post, same non-functional requirements apply:
- A hosting website shouldn’t be affected by adding the widget. It cannot negatively affect page load latency and performance in general. It may not conflict with existing code and styling of the page. In fact, the result you are seeing on this page is under 30KB and served in a single request (including embedded SVGs).
- The embeddable snippet must be simple to integrate, hard to make mistakes while embedding it, but allow to extend the functionality or change the look of the widget.
- It should be a joy to develop while supporting (with certain trade offs) to wide versions of browsers.
Application
Now that it is clear what is the end result, let’s take a look on the building blocks of our code:

So, there are basically 2 parts - the installation script on the left side of the diagram and the widget application itself on the right side.
Installation Script
I wrote in details why it looks like this here, so it is basically the same thing with a minor changes:
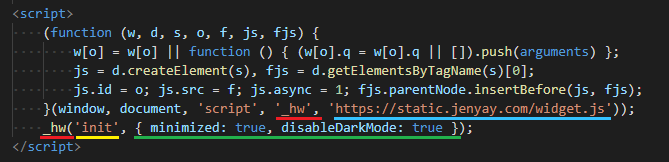
The highlighted parts are:
- In red is the instance name. It only matters when a multiple instances of the widget needs to be loaded into a page, then each instance requires a unique name. This way it allows us interact (initialize settings and call methods) with the specific instance.
- In yellow is the method to execute in a widget.
initis a special method and the only one required to “start” widget. There can be other methods (not in my example) called immediately or much later, which is the way to interact with the widget. - Optional parameters are in green.
initmethod’s parameter has a defined structure which “configures” the widget. - And in blue we have a full URL to the location where the widget is hosted. In some cases site owners prefer to host the widget in different location (e.g. under their own host name), but this obviously means they will lose updates of the widget that will be pushed to CDN.
Widget Application
The source code of the widget that you see on this page is located at this git repository. This is a fairly standard client-side application written in TypeScript. It is not far away from my original example, except that this time I took the example all the way to be more realistic in terms of functionality and “deployability” (I may have invented this word just now).
Please take into account that although the widget is fully functional, it is still for demonstration purposes and you should adjust it to your production realities.
Skeleton
If I peel all UI and state management from it, you will find the main difference of this application from other client-based applications - the main entry point to the application, AKA static void main() in other well known languages.

The module that handles loading of the application is /src/loader.ts, which consist of:
- Figure out the instance name (there can be multiple instances). The trick for this part is that the installation script will place an id attribute to
scripttag with value being unique name of the widget’s instance. Later on, when the widget loads it will get a hold of the “current” instance name via instance of script tag by usingdocument.currentScriptAPI. - Start processing all methods that were called while
widget.jswas asynchronously downloaded (basically those that are called in the installation script). One of those methods isinit, which is where we start our “rendering” (or not, if the widget is UI-less). - Store indication that the instance was “started”. The purpose of this is to prevent accidental multiple initializations of the same instance.
Note,
currentScriptis totally unsupported by IE11 (funny thing that it does in older versions of IE). This means that multi-instance of a widget with this implementation won’t work in IE11. There are ways to solve it, but I’m leaving it out of scope of the article.
Adding UI I decided to use Preact, because it’s just insanely small, which is really important for the widget. But nothing prevents you from using any other UI library.
If you are not familiar with Preact, it is basically React with the same JSX syntax, but much smaller because it doesn’t implement all features that React has.
Once we reach up to App.tsx, you will find a React-like application which leverage Context for global state, Layout to hold a common components, “pages views” which are loaded via a light in-memory router:
 Widget application structure
I intentionally decided not to use preact-router, because it adds event listeners to all anchors on document level, which is not acceptable for widget (remember not to mess with the hosting page). Since this router doesn’t use any shared resource of the page (e.g. URL, history, document event listeners), it’s scoped nicely to a single widget instance.
The last thing that is worth mentioning is an extensive usage of CSS modules. You will find the “main” styles in /src/layout/main.css, which also has styles-reset which should prevent page’s styles from affecting the widget. This reset is fairly basic, and if you are looking for more “aggressive” isolation from styles defined on a page, I would recommend Cleanslate.
Tooling
As in a regular node.js application, you can start a widget in your local environment via npm start, which will launch a demo HTML page /dev/index.html. The whole purpose of the page is to render the widget while developing it. The page contains an installation script, which embeds a version that is compiled from source each time changes are detected.
Everything that is related to building files, both for dev and release, into single-js-file is located in /webpack.config.js. This file contains similar configurations as in my previous post, except for the TypeScript compilation and instructions how to compile JSX via Preact.
Backend Interaction help-widget is also invokes REST remote APIs - sends contact form data and queries a list of FAQ questions. The backend itself is not interesting in scope of the widget. Yours probably will look very different in terms of language & runtime choice, persistence type, authorization, etc. But just for a sake of a fully functional example of the widget, I needed something simple, so I included it and it is hosted on Glitch.
Deployment
For this demo I decided to use AWS for hosting the widget and GitHub Actions for building and deploying it. There is nothing special in those two vendors to achieve the task, you can easily pick any other vendors, the concepts are pretty much the same.
Since the widget itself is no more than a static JavaScript file, I’m going to host it in S3 bucket and serve it via CloudFront - AWS CDN service. The way the file will get there, is that once we tag a particular commit in git, a workflow in GitHub’s Actions will grab the source, compile it and upload to AWS. The extended explanation of the same is on this diagram:

Workflows for GitHub Actions configured by adding files to /.github/workflows folder. Each file defines a workflow - ci.yml for build, release.yml for creating a new release and deploy.yml for uploading latest release to AWS.
ci.yml is pretty straight forward. Its whole purpose is to validate style and correctness of the code. It will be triggered on a new Pull Request, run lint, test & build and report the status back to Pull Request, so you can decide whether to merge the changes.
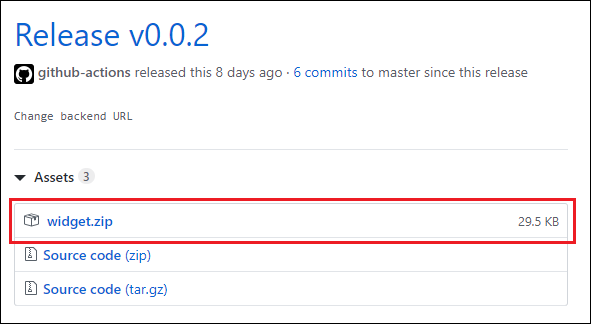
release.yml is triggered when a new tag is pushed. So, at some stage you decide that master branch is in a good shape to create a new version, thus you will tag it with tag in format of v*. For instance:
git tag v0.0.2
git push origin v0.0.2
The workflow then perform a build in “release” mode, which will output a single optimized JavaScript file, and attach the file as an asset to release:
Now that the release is persisted, a deploy workflow will be triggered.
deploy.ymlis very specific to the hosting model I chose - AWS S3 with CloudFront. Most likely you will need to change it to your scenario, or all together drop, if deployment is handled manually.
The workflow downloads a newly added release, uploads the JS file to S3 bucket and calls CloudFront cache invalidation API. Invalidation is not synchronous, but once finished a latest version of the widget will be available through CDN.
The required resources in AWS for hosting the widget, can be created with AWS CloudFormation template similar to this one.
Summary
In this article I tried to cover all the missing parts from my previous post - the result is GiHub repository that contains all sources for building and deploying a fully functional web widget.
The widget is built using TypeScript and Preact, deployed by GitHub Actions and hosted in AWS.
Comments